A custom google map on your website with a different visual look on elements such as roads, parks, and built-up areas rather than the standard google base map, creates a unique google map that you would not probably see on many websites. You can also create your own custom google map marker then add it to your google map, moving away further still, from the standard map.Have a Look at the image below to get a glimpse of what i’m talking about.
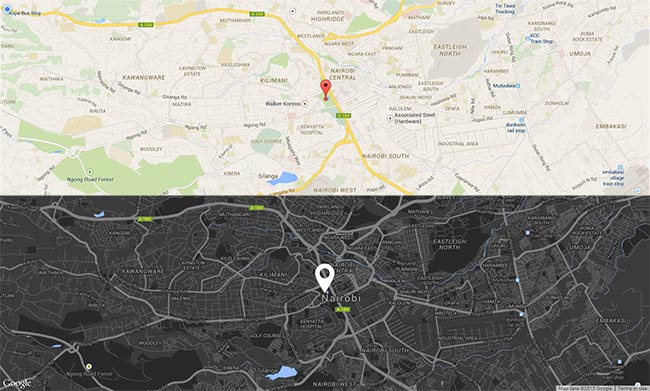
Google maps have created an absolutely lovely tool called Styled Maps Wizard, that lets you wonder away with your creativity for background colors on roads, parks,landscape, water bodies and whatever other google map element you want to play with. After you have finished playing around with Styled Maps Wizard tool, you’ll just copy and paste the styles on your application. It’s that simple. Let’s begin with the usual foundation, the HTML.
HTML
For our custom map to work, we are required to load the google map api. We’ll do exactly that by adding it on the head section of our html together with an external javascript file where we’ll place the Javascript code for the google map.
 <script src="https://maps.googleapis.com/maps/api/js"></script>
 <script src="js/gmap.js" type="text/javascript"></script>
On the HTML body we’ll add a div container to display the custom google map.
<div id="myMap"></div>
CSS
The most important CSS style we’ll need to add to our custom map is the height attribute and the width for the myMap container.
width:100%;
height: 400px;
Javascript
Here’s the fun bit! Let’s go through the different sections of the maps javascript code that we’ll require to create our map. First, we need to wrap the javascript code in a function for it to run when the page loads.
function googleMap() {}
We then target the container that will hold the map and place it in a variable.
function googleMap() {
// Targeting Map Div
var mapCanvas = document.getElementById('myMap');
}
Next, we’ll need to create the google map’s latLng object as a variable to place the latitude and longitude of the region you want your custom map to show.
function googleMap() {
// Targeting Map Div
var mapCanvas = document.getElementById('myMap');

// Map Region Latitude and Longitude
var latLng = new google.maps.LatLng(-1.290368, 36.816282);
}
We’ll also need to create the different options for the map. Notice how i’ve added a backgroundColor option for the map to blend in with my demo background. A white strip was appearing at the right edge of the map, and so added this background-color option to rectify it. I’ve also removed the element for the google map zoom that usually appears on the left side of the google map. The last two options depends totally on your liking but the first three options are required.
function googleMap() {
// Targeting Map Div
var mapCanvas = document.getElementById('myMap');

// Map Region Latitude and Longitude
var latLng = new google.maps.LatLng(-1.290368, 36.816282);

// Map General Options
var mapOptions = {
  center: latLng,
  zoom: 13,
  mapTypeId: google.maps.MapTypeId.ROADMAP,
  backgroundColor:'#2C2C2C',
  disableDefaultUI:true
}
}
Now, for the google map to show, we need to create the google map’s map object and then reference the map container and it’s options.
function googleMap() {
// Targeting Map Div
var mapCanvas = document.getElementById('myMap');

// Map Region Latitude and Longitude
var latLng = new google.maps.LatLng(-1.290368, 36.816282);

// Map General Options
var mapOptions = {
  center: latLng,
  zoom: 13,
  mapTypeId: google.maps.MapTypeId.ROADMAP,
  backgroundColor:'#2C2C2C',
  disableDefaultUI:true
}
// Creating the Custom Google Map
var map = new google.maps.Map(mapCanvas, mapOptions);
}
Next, we’ll add our google map custom marker. We’ll position the marker at the latLng variable we had created earlier on. Please take notice of where we are getting the custom marker image from in the image variable.
function googleMap() {
// Targeting Map Div
var mapCanvas = document.getElementById('myMap');

// Map Region Latitude and Longitude
var latLng = new google.maps.LatLng(-1.290368, 36.816282);

// Map General Options
var mapOptions = {
  center: latLng,
  zoom: 13,
  mapTypeId: google.maps.MapTypeId.ROADMAP,
  backgroundColor:'#2C2C2C',
  disableDefaultUI:true
}
// Creating the Custom Google Map
var map = new google.maps.Map(mapCanvas, mapOptions);

// Custom Marker
var image = 'images/pointer.png';
var positionMarker = new google.maps.Marker({
    position:latLng,
    map: map,
    icon: image
});
}
For the final bit of our map, let’s head over to the Styled Maps Wizard page.
The different google map features are located on the left side together with different styles that you can apply to the google map features. On the right side you will see the style values displayed for the different features.
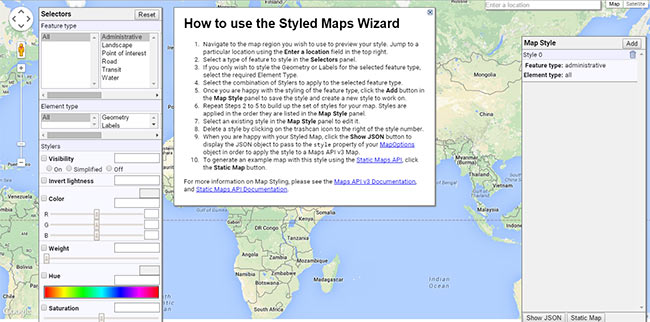
What I like about this tool is its simplicity. The directions on how to use it has been placed right at the center. After playing around with the tool for a few minutes, I clicked the show JSON button and copied the following styles:
[
    {
      "featureType": "landscape",
      "elementType": "geometry.fill",
      "stylers": [
        { "color": "#3b3b3b" }
      ]
    },{
      "featureType": "poi",
      "elementType": "geometry.fill",
      "stylers": [
        { "color": "#292929" }
      ]
    },{
      "featureType": "poi",
      "elementType": "geometry.stroke",
      "stylers": [
        { "color": "#343434" }
      ]
    },{
      "featureType": "transit",
      "elementType": "geometry.fill",
      "stylers": [
        { "color": "#292929" }
      ]
    },{
      "featureType": "road",
      "elementType": "geometry",
      "stylers": [
        { "color": "#808080" }
      ]
    },{
      "elementType": "labels.text.fill",
      "stylers": [
        { "color": "#9e9e9e" }
      ]
    },{
      "elementType": "labels.text.stroke",
      "stylers": [
        { "color": "#1e1e1e" }
      ]
    }
]
We’ll then add the above styles to our map using the API’s Styled Maps feature.
function googleMap() {
// Targeting Map Div
var mapCanvas = document.getElementById('myMap');

// Map Region Latitude and Longitude
var latLng = new google.maps.LatLng(-1.290368, 36.816282);

// Map General Options
var mapOptions = {
  center: latLng,
  zoom: 13,
  mapTypeId: google.maps.MapTypeId.ROADMAP,
  backgroundColor:'#2C2C2C',
  disableDefaultUI:true
}
// Creating the Custom Google Map
var map = new google.maps.Map(mapCanvas, mapOptions);

// Custom Marker
var image = 'images/pointer.png';
var positionMarker = new google.maps.Marker({
    position:latLng,
    map: map,
    icon: image
});

// Map Background and Font Color
map.set('styles', [
{
  "featureType": "landscape",
  "elementType": "geometry.fill",
  "stylers": [
    { "color": "#3b3b3b" }
  ]
},{
  "featureType": "poi",
  "elementType": "geometry.fill",
  "stylers": [
    { "color": "#292929" }
  ]
},{
  "featureType": "poi",
  "elementType": "geometry.stroke",
  "stylers": [
    { "color": "#343434" }
  ]
},{
  "featureType": "transit",
  "elementType": "geometry.fill",
  "stylers": [
    { "color": "#292929" }
  ]
},{
  "featureType": "road",
  "elementType": "geometry",
  "stylers": [
    { "color": "#808080" }
  ]
},{
  "elementType": "labels.text.fill",
  "stylers": [
    { "color": "#9e9e9e" }
  ]
},{
  "elementType": "labels.text.stroke",
  "stylers": [
    { "color": "#1e1e1e" }
  ]
}
]);
}
We’ll then finally call the googleMap function after the HTML has fully loaded using an event listener on the window.
function googleMap() {
// Targeting Map Div
var mapCanvas = document.getElementById('myMap');

// Map Region Latitude and Longitude
var latLng = new google.maps.LatLng(-1.290368, 36.816282);

// Map General Options
var mapOptions = {
  center: latLng,
  zoom: 13,
  mapTypeId: google.maps.MapTypeId.ROADMAP,
  backgroundColor:'#2C2C2C',
  disableDefaultUI:true
}
// Creating the Custom Google Map
var map = new google.maps.Map(mapCanvas, mapOptions);

// Custom Marker
var image = 'images/pointer.png';
var positionMarker = new google.maps.Marker({
    position:latLng,
    map: map,
    icon: image
});

// Map Background and Font Color
map.set('styles', [
{
  "featureType": "landscape",
  "elementType": "geometry.fill",
  "stylers": [
    { "color": "#3b3b3b" }
  ]
},{
  "featureType": "poi",
  "elementType": "geometry.fill",
  "stylers": [
    { "color": "#292929" }
  ]
},{
  "featureType": "poi",
  "elementType": "geometry.stroke",
  "stylers": [
    { "color": "#343434" }
  ]
},{
  "featureType": "transit",
  "elementType": "geometry.fill",
  "stylers": [
    { "color": "#292929" }
  ]
},{
  "featureType": "road",
  "elementType": "geometry",
  "stylers": [
    { "color": "#808080" }
  ]
},{
  "elementType": "labels.text.fill",
  "stylers": [
    { "color": "#9e9e9e" }
  ]
},{
  "elementType": "labels.text.stroke",
  "stylers": [
    { "color": "#1e1e1e" }
  ]
}
]);
}
google.maps.event.addDomListener(window, 'load', googleMap);
The reference of this tutorial is based on Google Map Tutorials which offer easy to follow insights that you can implement on your own personal projects.
If you like this tutorial, social share it and also like or follow the blog. Enjoy!